
Zoom R8 Manual: Comprehensive Article Plan
This detailed guide explores the Zoom R8’s features, setup, recording, editing, and integration—covering everything from initial power-up to advanced DAW control․
The Zoom R8 is a versatile digital recorder, audio interface, MIDI controller, and sampler, all rolled into one compact device․ It’s designed for musicians, songwriters, podcasters, and audio engineers seeking a portable and powerful solution for capturing and creating sound․ Numerous online resources, including PDF-MANUALS․com, highlight its comprehensive feature set․
Unlike simpler recorders, the R8 offers multi-track recording, looping capabilities, and extensive editing options directly on the unit․ It bridges the gap between field recording and studio production, offering a streamlined workflow for both beginners and experienced users․ Several user manuals aim to simplify its operation, acknowledging the need for a clearer guide․
What is the Zoom R8?
The Zoom R8 is a multifaceted device functioning as an 8-track digital recorder, a USB audio interface, a dedicated MIDI controller, and a creative sampler․ It’s a standalone unit capable of capturing high-quality audio without requiring a computer, yet seamlessly integrates with DAWs for expanded editing and mixing․ Resources like ProSound detail its capabilities alongside the R16 and R24 models․
Essentially, it’s a portable studio․ The R8 allows simultaneous two-channel recording, with playback up to eight channels, offering a balance between functionality and compactness․ User manuals emphasize initial setup and maintenance procedures for optimal performance․
Key Features of the Zoom R8
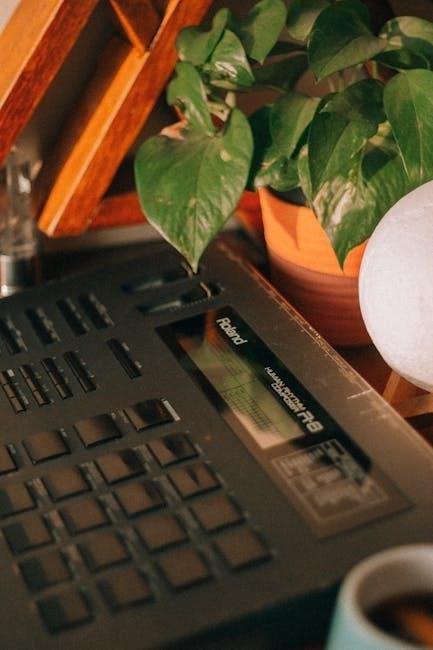
The Zoom R8 boasts a powerful suite of features, including its 8-track recording capability and integrated sampler․ It functions as a USB 2․0 audio interface, facilitating direct connection to computers․ Crucially, it also operates as a DAW controller, streamlining workflow․ A core feature, highlighted in user resources, is its ability to record two channels simultaneously while offering up to eight channels of playback․
The “Book of R8 Users Manual” aims to simplify operation, and the device supports comprehensive editing and effects processing, making it a versatile tool for musicians and sound designers․

Unboxing and Initial Setup
Upon unboxing your Zoom R8, ensure all components are present․ Initial setup involves understanding the device’s power requirements and connecting essential peripherals․ The user manual details the procedure for initial configuration and connecting the unit․ Proper setup is crucial for optimal performance and avoiding potential issues․ Resources emphasize the importance of familiarizing yourself with the device before attempting complex recordings․
This includes understanding how to power the R8 and correctly connect microphones and instruments, as outlined in available documentation and online guides․
Powering the Zoom R8
The Zoom R8 offers flexible power options, including operation via USB, AC adapter, or batteries․ Utilizing the AC adapter ensures consistent power during extended recording sessions․ Battery life varies depending on usage, so having spares is advisable for field recording․ The manual details proper battery installation and charging procedures․ Understanding power management is vital for uninterrupted workflow․
Always refer to the official documentation for specific power supply requirements and safety guidelines to prevent damage to the device or interruptions during critical recordings․
Connecting Microphones and Instruments

The Zoom R8 boasts versatile input options, accommodating both microphones and instruments․ Standard XLR and ¼-inch inputs are available, supporting various connection types․ The manual clearly illustrates proper cable connections and input gain staging․ Phantom power (+48V) is available for condenser microphones, activated via dedicated switches․
Ensure correct impedance matching for optimal audio quality․ Instrument inputs accept line-level signals from guitars, keyboards, and other sources․ Careful attention to these connections ensures clean and professional recordings․
Understanding the R8 Interface
The Zoom R8’s interface combines physical controls and a display screen for intuitive operation․ Familiarizing yourself with the layout is crucial for efficient workflow․ The front panel houses essential controls like input gain knobs, track arm buttons, and transport controls․ The rear panel provides connections for audio inputs/outputs, USB, and power․
The display screen offers visual feedback and menu navigation․ Mastering the menu system unlocks the R8’s full potential, allowing access to advanced settings and editing functions․
Front Panel Controls
The Zoom R8’s front panel is designed for hands-on control during recording and performance․ Key elements include dedicated input gain knobs for precise level adjustments, allowing optimal signal capture․ Track arm buttons enable individual track activation for multi-track recording․ Transport controls – play, stop, record, rewind, and fast forward – facilitate seamless operation․
Additional controls manage looping, sampling, and effects․ A prominent rotary encoder navigates menus and parameters, while dedicated buttons provide quick access to essential functions․ Understanding these controls is vital for efficient workflow․
Rear Panel Connections
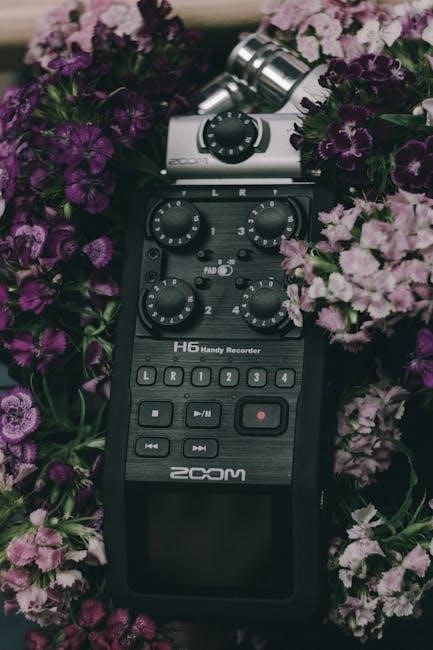
The Zoom R8’s rear panel provides comprehensive connectivity options for diverse recording setups․ It features dual XLR/TRS combo jacks for microphone and line-level inputs, supporting both balanced and unbalanced connections․ A dedicated stereo line input accommodates additional audio sources․ USB connectivity enables audio interface functionality and DAW control․
Separate left and right main outputs (XLR) deliver professional-grade audio monitoring․ A headphone output with level control allows for private listening․ Finally, a phantom power switch provides the necessary voltage for condenser microphones, expanding recording possibilities․
Display Screen Navigation
The Zoom R8’s display screen is central to its operation, providing visual feedback and control access․ A central rotary encoder and dedicated buttons facilitate intuitive navigation through menus and parameters․ The screen clearly displays track information, levels, effects settings, and recording status․
Users can easily select tracks, adjust input gains, and modify effects using the encoder and buttons․ Menu options are logically organized, allowing quick access to essential functions․ Understanding the screen layout is crucial for efficient workflow and maximizing the R8’s capabilities․
Recording Basics
Initiating a recording with the Zoom R8 involves several fundamental steps; First, ensure proper input sources are connected – microphones or instruments․ Setting appropriate input levels is critical to avoid clipping or excessively low signals․ Utilize the R8’s gain knobs for precise adjustment, monitoring the display for optimal levels․
Next, arm the desired tracks for recording․ The R8 allows multi-track recording, enabling layered compositions․ Finally, press the record button to begin capturing audio․ Monitoring through headphones is recommended to confirm signal quality and timing․
Setting Input Levels
Achieving optimal input levels is paramount for clean recordings on the Zoom R8․ Begin by connecting your microphone or instrument․ Gradually increase the gain using the dedicated input knobs while closely observing the R8’s display․ Aim for signal peaks that reach approximately -12dBFS to -6dBFS, leaving headroom to prevent distortion․
Avoid letting the levels consistently hit 0dBFS (clipping)․ Utilize the R8’s metering to visually assess signal strength․ Test recordings are crucial to fine-tune levels before committing to a full performance․ Proper gain staging ensures a professional sound․
Track Arming and Monitoring
Before recording, you must ‘arm’ the desired tracks on the Zoom R8․ This activates them for input․ Press the corresponding track buttons to illuminate them, indicating they are ready to record․ Simultaneously, enable monitoring for each armed track to hear the incoming signal through headphones or connected speakers․
Adjust individual track volumes using the faders to create a balanced monitoring mix․ Ensure phantom power (+48V) is engaged if using condenser microphones․ Careful monitoring prevents unwanted noise and confirms proper signal flow before recording begins․
Starting and Stopping Recording
Initiate recording on the Zoom R8 by pressing the dedicated ‘Record’ button․ The display will confirm recording status, and the internal storage or SD card will begin capturing audio․ Monitor levels closely during recording to avoid clipping or excessively low signals․ To pause recording temporarily, press ‘Record’ again; pressing it a second time resumes․
To halt recording entirely, press the ‘Stop’ button․ The R8 will save the recorded take․ Review your recordings promptly to ensure quality and identify any necessary adjustments for subsequent takes․
Advanced Recording Techniques
The Zoom R8 excels beyond basic recording with its looping and sampling capabilities․ Utilize the looping function to create layered performances, ideal for beatboxing or instrumental arrangements․ The built-in sampler allows capturing and manipulating audio snippets for unique textures and effects․ Mastering multi-track recording involves careful track arming, level setting, and monitoring․
Experiment with overdubbing to build complex arrangements․ Remember to bounce tracks strategically to manage file sizes and optimize workflow․ These techniques unlock the R8’s full creative potential․
Using Looping Functionality
The Zoom R8’s looping feature empowers real-time performance and composition․ Access loop settings via the dedicated loop control section․ Define loop in/out points precisely for seamless repetition․ Experiment with different quantization settings to ensure rhythmic accuracy․ Layer multiple loops to build complex arrangements, perfect for solo performers or band rehearsals․
Utilize the undo/redo function to correct mistakes during loop creation․ Remember to save loop projects frequently to avoid data loss․ Mastering looping unlocks dynamic musical possibilities․
Utilizing the Sampler
The Zoom R8’s sampler allows for creative sound design and unique musical textures․ Capture audio directly into sample slots using external inputs or internal recording․ Adjust sample start and end points for precise editing․ Modify pitch, playback speed, and volume to sculpt desired sounds․ Assign samples to pads for immediate triggering during performance or recording․
Explore various sample editing options, including looping and time-stretching․ Save and recall custom sample sets for different projects․ The sampler expands the R8’s sonic palette significantly․
Multi-Track Recording Workflow
The Zoom R8 excels at multi-track recording, enabling layered compositions․ Begin by setting input levels for each source – microphones or instruments․ Arm individual tracks for recording, carefully monitoring levels to avoid clipping․ Record each part separately, building up the arrangement track by track․ Utilize the R8’s built-in effects during recording or post-production․
Bounce tracks to free up memory and streamline the mixing process․ The R8’s intuitive interface facilitates a smooth and efficient multi-track workflow, ideal for songwriters and producers․
Editing and Mixing on the R8
The Zoom R8 provides essential editing and mixing capabilities directly on the device․ Basic functions include trimming, copying, pasting, and moving regions․ Apply built-in effects like compression, EQ, and reverb to shape your sound․ The R8’s mixing console allows for level adjustments, panning, and sends to create a balanced mix․
Mastering tools offer final polish, enhancing loudness and clarity․ While not a full-fledged DAW, the R8’s onboard tools are sufficient for creating polished, professional-sounding recordings․
Basic Editing Functions
The Zoom R8 offers a suite of fundamental editing tools for refining your recordings․ These include trimming unwanted sections from audio regions, copying and pasting segments for arrangement, and moving regions along the timeline for precise placement․ Users can also split regions to isolate specific parts for individual processing․
Undo and redo functions provide safety during experimentation․ These basic functions, accessible directly on the R8, allow for quick and efficient manipulation of recorded audio, forming the foundation of your editing workflow․
Applying Effects
The Zoom R8 boasts a range of built-in effects to enhance your audio․ These encompass reverb, delay, chorus, flanger, and compression, allowing for creative sound design and polishing of recordings․ Effects can be applied to individual tracks or the entire mix, offering flexibility in processing․
Parameters are adjustable, enabling customization of each effect’s character․ Users can save effect chains as presets for quick recall, streamlining the mixing process and ensuring consistent sonic results across projects․ Experimentation is encouraged!
Mixing and Mastering
The Zoom R8 facilitates basic mixing directly on the device․ Adjust track levels, pan positions, and apply effects to create a balanced and cohesive sound․ While not a full-fledged DAW, the R8 provides essential tools for preliminary mixing before exporting to a computer․
Mastering capabilities are limited, focusing on overall volume adjustment and subtle EQ․ For professional-grade mastering, transferring the mix to a dedicated DAW is recommended․ Utilize the R8’s mixing features to refine your tracks before final polishing elsewhere․
Connectivity and Computer Integration
The Zoom R8 excels as a USB audio interface and DAW controller․ Connecting to a computer unlocks its full potential for seamless integration with recording software․ In USB Audio Interface mode, the R8 transmits multi-track audio for editing and mixing within your preferred DAW․
Furthermore, the R8 offers DAW control features, allowing you to manage transport controls and potentially other parameters directly from the device․ This streamlines workflow, blending the convenience of standalone recording with the power of computer-based production․
USB Audio Interface Mode
Activating USB Audio Interface mode transforms the Zoom R8 into a powerful recording tool for your computer․ Connecting via USB allows for multi-track audio transmission, enabling direct recording into your Digital Audio Workstation (DAW)․ The R8 functions as a high-quality audio input and output device, bypassing your computer’s internal sound card․
This mode supports simultaneous recording of multiple channels, depending on the R8’s configuration and your computer’s capabilities․ Ensure you select the Zoom R8 as your audio interface within your DAW’s settings for optimal performance and seamless integration․
DAW Control Features
Beyond audio interface functionality, the Zoom R8 offers impressive DAW control capabilities․ It can emulate transport controls – play, stop, record, rewind, and fast forward – allowing hands-on operation of your recording software․ This streamlines your workflow, reducing reliance on mouse and keyboard commands․
Configuration is key; you’ll need to map the R8’s controls within your DAW’s settings to correspond with the desired functions․ Compatibility varies between DAWs, so consult your DAW’s documentation for specific instructions․ This feature enhances creative flow and provides tactile control during recording and mixing sessions․

Troubleshooting Common Issues
Encountering problems? The Zoom R8, while robust, can present occasional hiccups․ Audio input issues often stem from incorrect gain staging or faulty cable connections – verify levels and cabling first․ Connectivity errors with your computer may require driver re-installation or USB port switching․ Ensure the R8 is recognized by your operating system․
If the unit freezes, a simple power cycle usually resolves the issue․ Consult the official Zoom website and online forums for solutions to more complex problems․ Regularly checking for firmware updates can also prevent many common glitches․
Audio Input Problems
Experiencing silent or distorted audio? Begin by meticulously checking all cable connections – loose or damaged cables are frequent culprits․ Incorrect gain staging is a common issue; ensure input levels aren’t too low (resulting in noise) or too high (causing clipping)․ Verify phantom power is enabled for condenser microphones when needed․

Experiment with different input sources and microphone types to isolate the problem․ If issues persist, try a different USB port or cable․ Consult the Zoom R8 manual for specific troubleshooting steps related to input impedance and signal routing․
Connectivity Errors
Encountering issues connecting the Zoom R8 to your computer? First, confirm you’re using a compatible USB cable and port․ Ensure the R8 is selected as the audio device within your computer’s sound settings and your Digital Audio Workstation (DAW)․ Driver conflicts can occur; reinstalling the latest Zoom USB drivers often resolves this․
Try a different USB cable or port․ If using USB hub, connect directly to the computer․ Check for firmware updates for the R8, as these often include connectivity improvements․ Refer to the Zoom support website for detailed troubleshooting guides․

Firmware Updates and Maintenance
Keeping your Zoom R8’s firmware current is crucial for optimal performance and stability․ Regularly check the official Zoom website for available updates․ Download the latest firmware and follow the provided instructions carefully – typically involving transferring the file to an SD card and initiating the update through the R8’s menu․
Proper maintenance includes cleaning the unit with a soft, dry cloth and storing it in a dust-free environment․ Avoid extreme temperatures and humidity․ Periodically back up your projects to prevent data loss․
Zoom R8 vs․ Other Zoom Recorders (R16, R24)
The Zoom R8 distinguishes itself from the R16 and R24 through its streamlined design and focus on portability․ While the R16 and R24 offer more simultaneous recording channels – up to 8 and 16 respectively – the R8 excels in compactness․ The R8 records two channels simultaneously, playing back up to eight․
The R16 and R24 are better suited for larger, multi-instrumental projects, whereas the R8 is ideal for solo artists or smaller ensembles prioritizing convenience and a smaller footprint․
Resources and Further Learning
To deepen your understanding of the Zoom R8, several resources are readily available․ The Official Zoom Website provides downloadable manuals, firmware updates, and helpful FAQs․ Online forums and communities, dedicated to Zoom products, offer a platform for users to share tips, troubleshoot issues, and exchange creative ideas․
Exploring these platforms can unlock advanced techniques and solutions to common challenges․ User-created tutorials and guides supplement the official documentation, offering diverse perspectives and practical applications for the R8’s capabilities․
Official Zoom Website
The official Zoom Corporation website serves as the primary hub for all things R8․ Here, you’ll find the most up-to-date user manuals in PDF format, allowing for offline access and detailed study of the recorder’s functions․ Crucially, the site hosts the latest firmware updates, essential for optimizing performance and addressing potential bugs․
Beyond documentation, Zoom’s website provides access to support resources, including FAQs and troubleshooting guides, ensuring a smooth user experience․ Regularly checking this site is vital for maximizing your R8’s potential․
Online Forums and Communities
Numerous online forums and communities dedicated to music production and Zoom recorders offer invaluable peer-to-peer support for R8 users․ These platforms are excellent resources for troubleshooting issues, sharing recording techniques, and discovering creative workflows․
Experienced users frequently post tips, tricks, and custom settings, expanding the R8’s capabilities beyond the official manual․ Engaging with these communities fosters learning and provides a space to ask questions, receive feedback, and connect with fellow musicians․ A quick search will reveal active groups!
Zoom R8 Specifications
The Zoom R8 is a versatile device boasting 8-track recording capabilities, functioning as a digital recorder, USB audio interface, MIDI controller, and sampler․ It features eight combination XLR/TRS inputs, allowing for simultaneous recording of multiple sources․
Its compact design houses a built-in stereo microphone and supports SD card storage up to 128GB․ The R8 offers 24-bit/44․1kHz recording quality and includes onboard effects․ Power is supplied via USB or AA batteries, making it ideal for portable recording sessions․
Accessories for the Zoom R8
Enhance your Zoom R8 experience with essential accessories․ A high-capacity SD card (up to 128GB) is crucial for extended recording sessions․ Consider a quality USB cable for reliable computer connectivity and data transfer․
External microphones, such as condenser or dynamic mics, will significantly improve audio capture․ A sturdy tripod or stand is recommended for optimal microphone placement․ Protective cases and bags offer portability and safeguard against damage․ Finally, replacement AA batteries ensure uninterrupted recording during field work․